« Back to Knowledge Base

How to add Microsoft Teams via NDI to your vMix production
How to add Microsoft Teams via NDI- A Step by Step Guide
Using vMix and the latest version of Microsoft Teams, it is possible to bring in a Teams caller from the same PC as vMix and also send them a return video and audio feed.
Here's a video all about it, and you can follow along with the steps below...
Please note: NDI capabilities in Teams is only available in a paid version of Microsoft Teams, such as a subscription or business account. If you only have the free version of Teams, this does not support NDI. For the free version, please see the below knowledge base article guide:
https://www.vmix.com/knowledgebase/article.aspx/375/capturing-a-free-teams-call-or-meeting-into-vmix
Requirements
- A paid version of Microsoft Teams installed (such as a subscription or business account). You will need to have your Administrator enable a meeting policy setting to "Broadcast Production with NDI" via the Microsoft Team admin center.
- Latest version of the NDI Tools which contains the NDI Webcam program in order to send a virtual camera output to Teams from vMix. https://ndi.video/tools/
- A licensed copy of vMix 21 or higher
Workflow
Step 1
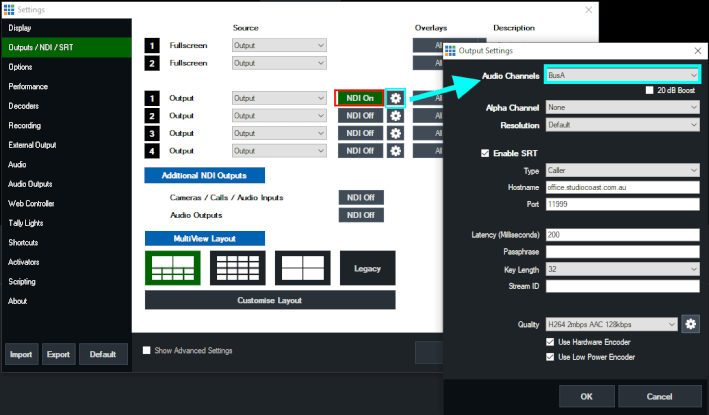
Open vMix and go to Settings -> Outputs/NDI/SRT -> Then next to Output 1, tick the NDI button so it is green and says NDI On.
Next click the cog icon to the right of this and select BusA from the Audio Channels dropdown menu. This will enable the NDI output from vMix with BusA audio included. Using Bus A audio means we can control what audio is sent back to the Teams Caller - to avoid any audio feedback.
Step 2
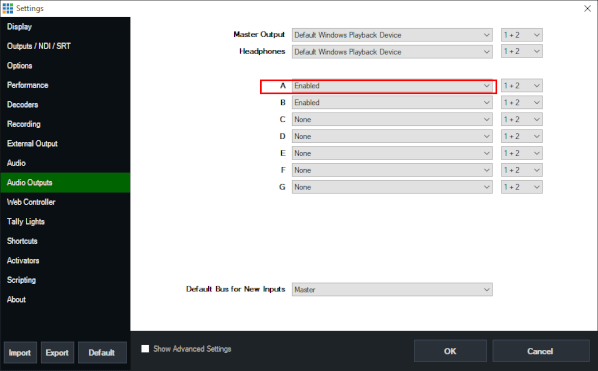
Next go to Settings -> Audio Outputs -> and set the Bus A option to Enabled. Then press OK.
Step 3
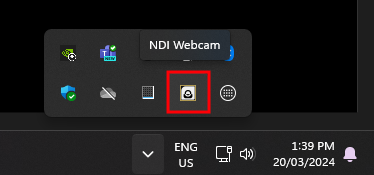
Open the NDI Webcam program that comes installed with the NDI Tools. Once running, click the arrow in the system tray at the bottom right of Windows and double click the yellow and black icon to open the NDI Webcam app.
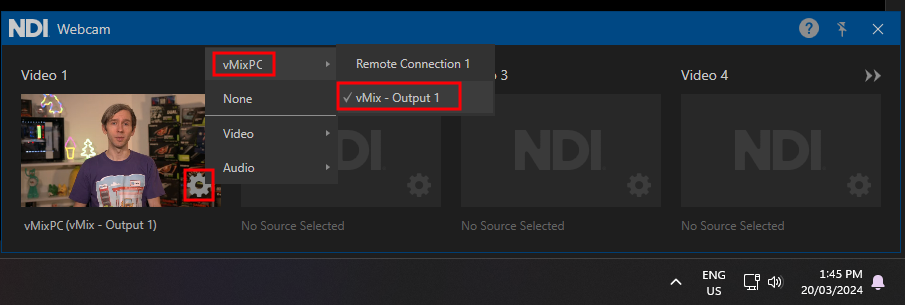
The Webcam app supports 4 NDI virtual webcams. In this example, we will just configure NDI Webcam 1. Click the cog icon button under Video 1. Select your computer name. Then select the vMix - Output 1 option.
Step 4
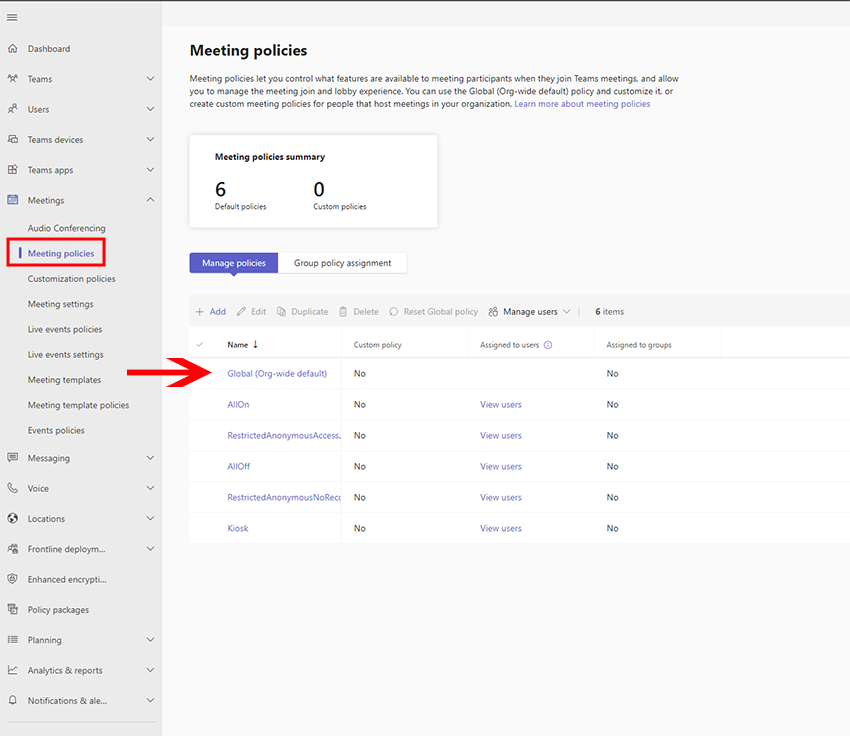
Get your Administrator to create a policy that allows for NDI usage in the Microsoft Teams admin center. To do this, they need to do the following
1) Go to the Microsoft Teams Admin Center in a web browser: https://admin.teams.microsoft.com/ (note: not the web browser based Teams app admin)
2) Go to Meetings from the left sidebar
3) Select Meeting Policies
4) Under Manage Policies, click on Global
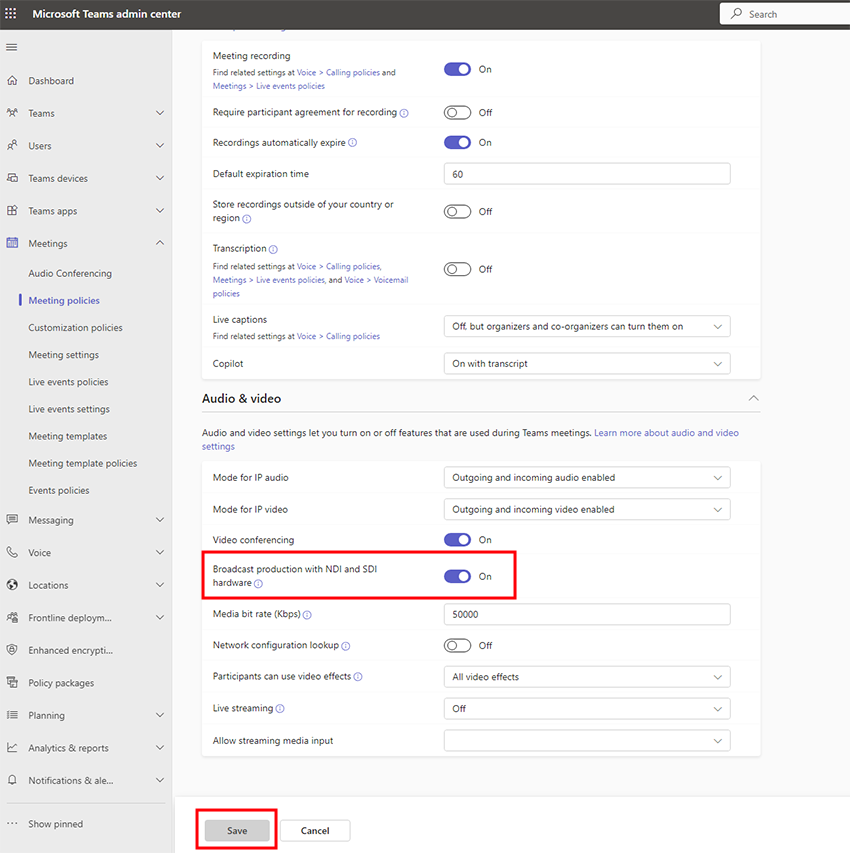
5) Scroll down to the Audio and Video section. Then enable the option for Broadcast production with NDI and SDI hardware then press Save.
Step 5
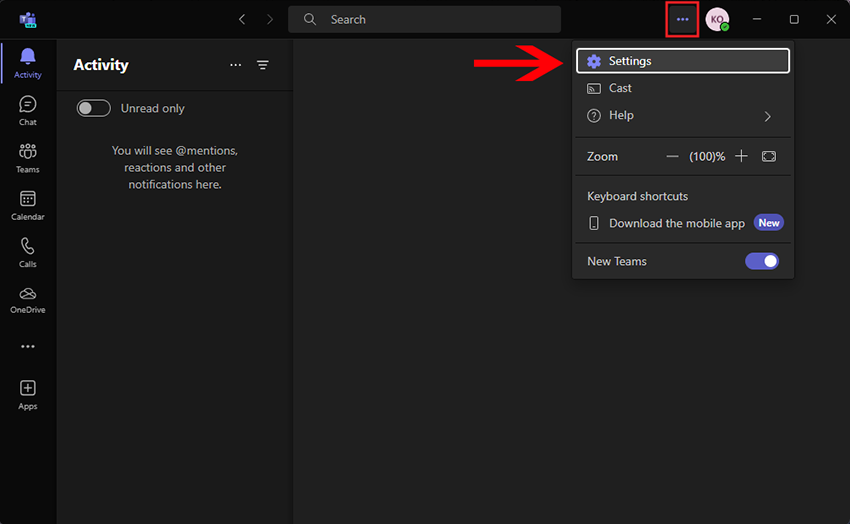
Next head to your Teams installation and click on the settings menu at the top right (3 dotted button). Then select Settings.
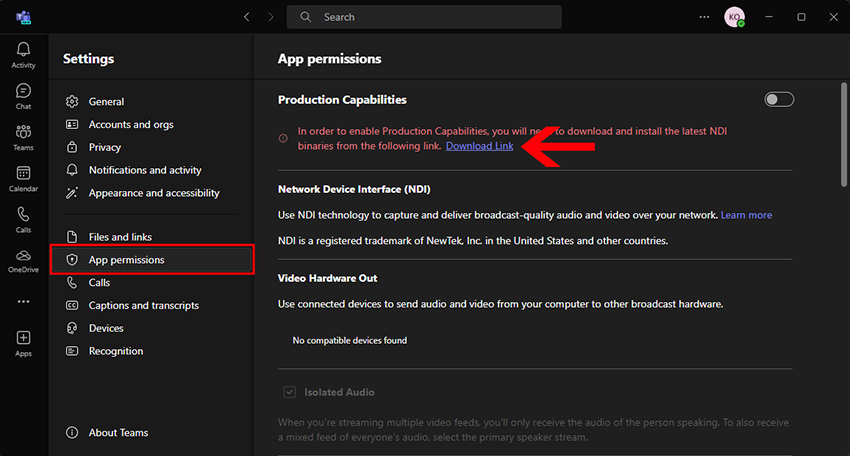
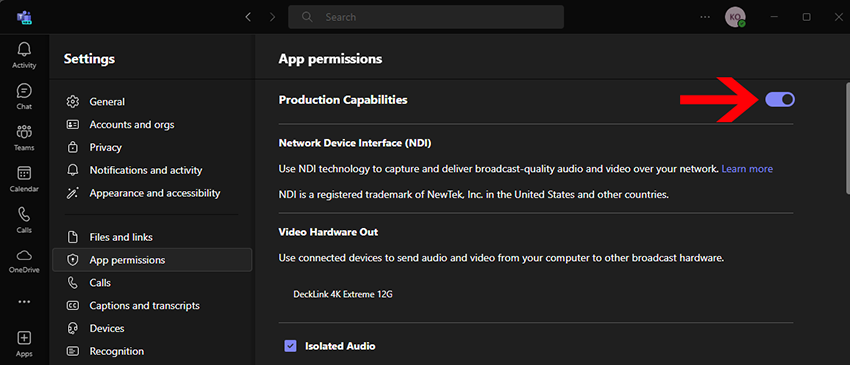
In the new window that appears, select the App Permissions tab. The ability to enable NDI is now included in the Teams "Production Capabilities" permissions. To enable, you will need to firstly download and install the latest NDI binaries from the link provided.
Once installed, return to the App Permissions section of the Teams settings. Toggle the button on to enable production capabilities which includes NDI.
Step 6
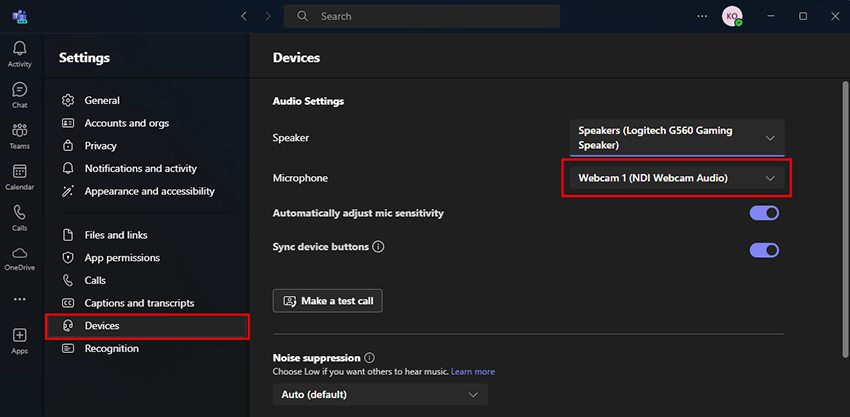
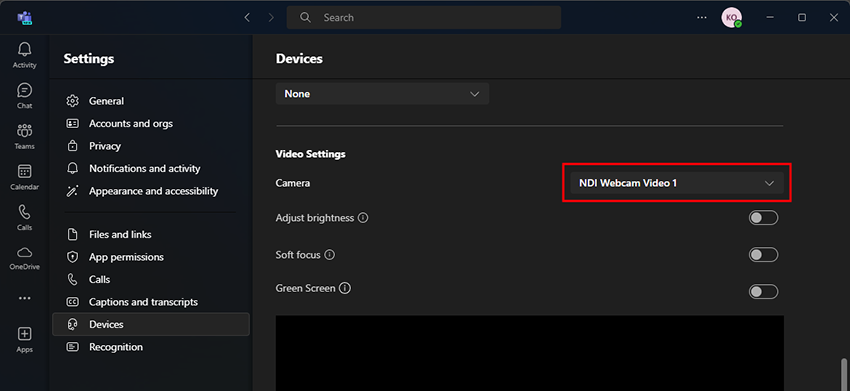
Keeping the settings window open, next select the Devices tab. Then change the following settings:
Microphone - select Webcam 1 (NDI Webcam Audio)
Speakers - Select your speakers (we'll mute this later)
Camera - NDI Webcam Video 1
Step 7
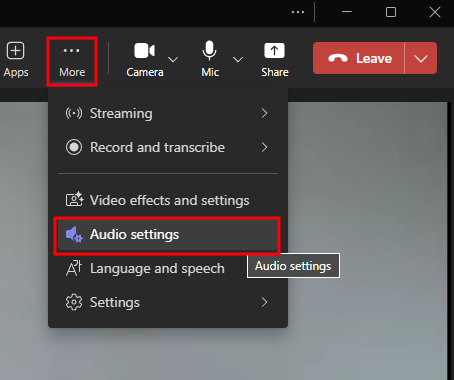
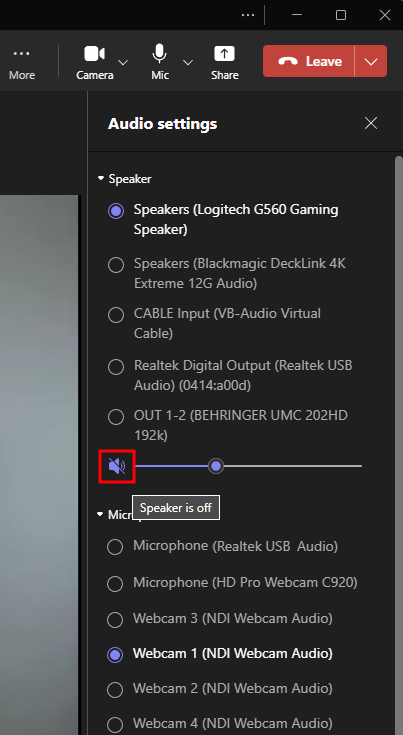
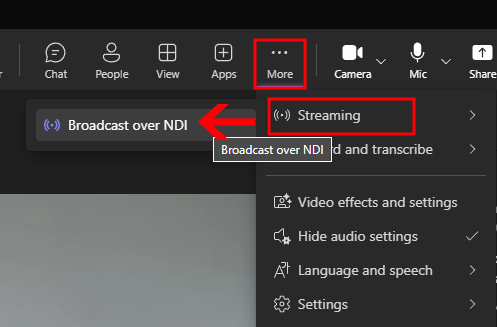
Start your Teams Call, then go to the More Settings button (3 dotted button) and select Audio Settings.
Click the mute button under Speakers. As we will be hearing all Zoom guest audio within vMix we don't want to hear a double up of audio this way.
Finally, ensure you have enabled Broadcast over NDI. Click the More Settings button (3 dotted button), select Streaming and finally Broadcast over NDI.
Step 8
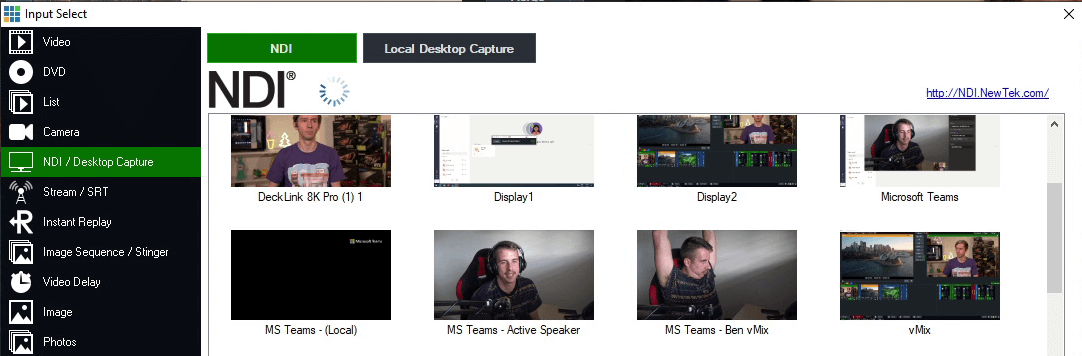
Open vMix and go to Add Input -> NDI / Desktop Capture -> NDI. Then select the Teams NDI output that you want to use in your production.
Step 9
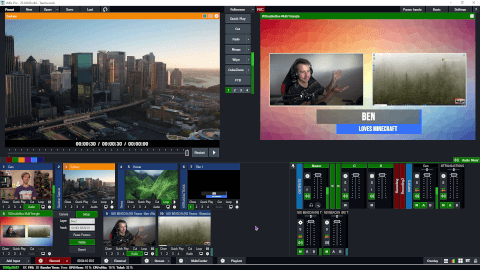
Go to the Audio Mixer to the right hand side of vMix and adjust the following:
Your own microphone audio input in vMix
Click the cog icon to open its settings. Then next to the headphones icon at the bottom left of this window, turn the headphones control completely off by dragging it down with the mouse
All other audio inputs you wish to send to the Teams Call - except for the NDI Teams Input
Activate the A bus button on all other audio inputs you want your Teams caller to hear, such as your own microphone. Make sure you do not activate the A bus button on the NDI Teams Input so the caller doesn't hear themselves.

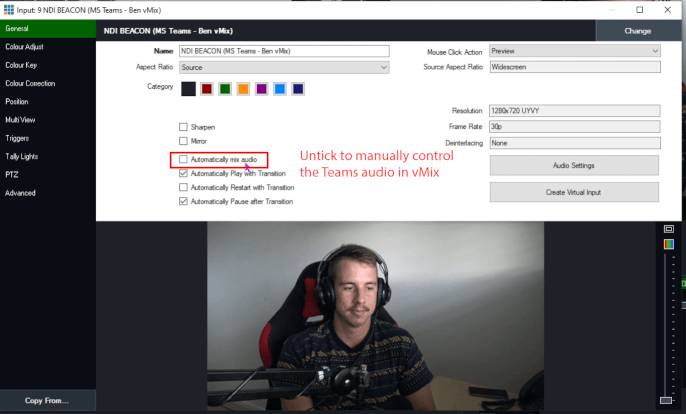
If you want to hear your Caller's audio at all times in the production and not just when they're in the Output...be sure to open up their Input settings and turn off Automatically Mix Audio. Then switch it on/off from the vMix interface when you want to use it.
Step 10
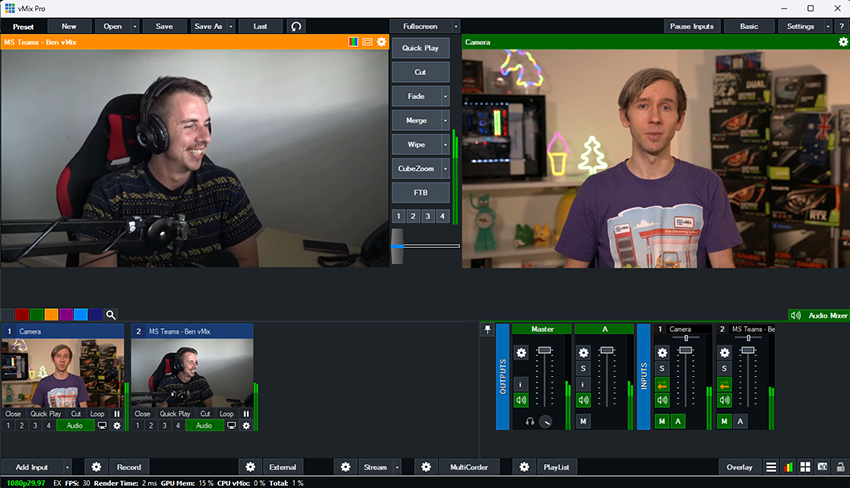
You can now use Teams as a part of your production just like a normal input! Make it full screen, add it to a layer, create a Virtual Set with it, PiP etc
Last Updated: Thursday, May 15, 2025 2:45:55 PM